Evasive port scanning while on internal networks
A simple discussion on common evasion and detection techniques regarding host discovery and port scanning on internal networks using nmap and various other tools.

Do not perform any of the offensive techniques covered in this post on systems or networks you do not own or have explicit permission to test on. You are solely responsible for any actions you perform while using the information detailed in this post.
In this post, I’m going to cover some basic techniques for evading detection while scanning for hosts and their open ports on an internal network. I’ll also try to cover some defensive strategies for detecting host scanning and limiting how much an adversary is able to enumerate. I’ve set up my own test network on a Proxmox server using pfSense (with OpenVPN and Suricata enabled), as well as a Linux and Windows host to scan. The topology looks something like this:

 Diagram 1: Test network topology.
What is Suricata?
Suricata is a popular open-source network IDS/IPS (Intrusion Detection System / Intrusion Prevention System) that inspects network packets using a rule-based detection engine. It has many other powerful features, but I will be focusing mainly on the rule-based detection engine in this post. I’m using Suricata to inspect traffic coming from OpenVPN (172.16.20.0/24) to the 192.168.20.0/24 network. As far as detection rules, I will be using the default ruleset that comes with Suricata and the Emerging Threats open ruleset.
What is network scanning?
Network scanning is the process of searching for hosts on a network, open ports on a host, and potential vulnerabilities in hosted services. Scanning is one of many steps in performing reconnaissance on a target network or host. You can carry out a network scan by using custom built scripts or well-known tools such as nmap, masscan, shodan, nessus, and many more. Each tool provides its own sense of insight and can serve different purposes. There is no one tool for the job, but instead many tools that can carry out specific functions. As an example, you wouldn’t use shodan to figure out what hosts and their ports are discoverable from within an internal network. Equally, you wouldn’t rely on nmap to scan for vulnerable services on your network.
With network scanning, you are able to create a map of your target network and further plan your attack (or defense). Scanning is probably one of the most important steps in not just the reconnaissance stage, but the attack methodology. Without it, you’re just blindly throwing exploits at a target (possibly not your intended target) with little hope for success.
Active vs. passive scanning
Active scanning is when you are sending packets to a host in order to determine open ports and services hosted. This approach is typically loud, which can carry the risk of triggering alerts in an IDS/IPS. It also has the potential to generate a large amount of network traffic and cause adverse reactions if not properly managed.
Passive scanning is when you only listen for traffic on a network, not generating any packets. This approach is typically harder to do in an adversarial engagement unless certain provisions are made (e.g. you have access to a Wi-Fi network where you can listen to radio traffic, or you have access to a monitor port on a switch or router) or you’re able to gain the access necessary to perform these scans. Network based IDS solutions make use of passive scanning to inspect traffic as it flows over the network.
In this post, I will be using active scanning methods to determine hosts and services on my test network.
What is the point of stealth and evasion?
When carrying out an adversarial engagement, your ultimate goal is to strengthen your client’s defenses (unless you’re a criminal organization or state-sponsored hacker). You’re acting like a threat-actor would, and trying to go unnoticed while you attempt to simulate the exfiltration of secrets or holding data and infrastructure ransom. When successfully performing evasive techniques, you’re making gaps in the SOC’s (Security Operations Center’s) detection capabilities known to the blue team. This helps the blue team to strengthen those detection rules in an attempt to catch and neutralize threat actors within their network.
There are whole career paths that go into the research and development of evasive TTPs (Tactics, Techniques, and Procedures), as well as engineering methods and rules to detect them. It’s a constant game of sophisticated cat and mouse.
One other strength to carrying out evasive scans is that you are forced to think about what you are trying to accomplish. With a tactical approach, you are less likely to cause issues on the network. For example, say a device on the network is not able to handle a massive flood of TCP packets to 65535 different ports. You’ll probably end up crashing the device and causing an outage. And if you were trying to go undetected, you’ve possibly just blown your team’s cover.
Evasion is important in successfully simulating adversarial actions. Without it, our detection capabilities would fall short to the many threat actors the internet faces every day. It should be noted that being evasive comes with a lot of practice and experience. You have to thoroughly understand the tools and methodologies you’re using to carry out actions in a stealthy manner.
Scanning an internal network
Scanning without evasive techniques
I am a huge fan of watching IppSec’s YouTube channel. At the beginning of all of his Hack the Box walk throughs, he always starts with an nmap scan. He’ll enable default scripts (-sC flag) and scan for versions (-sV flag) when scanning a host. I wanted to start off with this type of scan, since it seems to be a good default when scanning a network or a host. I’ll begin by running the following nmap command to target my two test systems:
1
nmap -sV -sC 192.168.20.5-10
If you have Suricata configured as well as the default and Emerging Threats rules enabled, you would see a wave of alerts looking something like this:
1
2
3
4
5
6
7
8
9
10
11
12
13
14
15
16
17
18
19
20
21
22
[**] [1:2023753:4] ET SCAN MS Terminal Server Traffic on Non-standard Port [**] [Classification: Attempted Information Leak] [Priority: 2] {TCP} 172.16.20.2:59020 -> 192.168.20.10:464
[**] [1:2023753:4] ET SCAN MS Terminal Server Traffic on Non-standard Port [**] [Classification: Attempted Information Leak] [Priority: 2] {TCP} 172.16.20.2:47674 -> 192.168.20.10:445
[**] [1:2010937:3] ET SCAN Suspicious inbound to mySQL port 3306 [**] [Classification: Potentially Bad Traffic] [Priority: 2] {TCP} 172.16.20.2:40779 -> 192.168.20.5:3306
[**] [1:2010936:3] ET SCAN Suspicious inbound to Oracle SQL port 1521 [**] [Classification: Potentially Bad Traffic] [Priority: 2] {TCP} 172.16.20.2:40779 -> 192.168.20.5:1521
[**] [1:2010935:3] ET SCAN Suspicious inbound to MSSQL port 1433 [**] [Classification: Potentially Bad Traffic] [Priority: 2] {TCP} 172.16.20.2:40779 -> 192.168.20.5:1433
[**] [1:2010939:3] ET SCAN Suspicious inbound to PostgreSQL port 5432 [**] [Classification: Potentially Bad Traffic] [Priority: 2] {TCP} 172.16.20.2:40779 -> 192.168.20.5:5432
[**] [1:2010936:3] ET SCAN Suspicious inbound to Oracle SQL port 1521 [**] [Classification: Potentially Bad Traffic] [Priority: 2] {TCP} 172.16.20.2:40781 -> 192.168.20.10:1521
[**] [1:2010939:3] ET SCAN Suspicious inbound to PostgreSQL port 5432 [**] [Classification: Potentially Bad Traffic] [Priority: 2] {TCP} 172.16.20.2:40779 -> 192.168.20.10:5432
[**] [1:2010935:3] ET SCAN Suspicious inbound to MSSQL port 1433 [**] [Classification: Potentially Bad Traffic] [Priority: 2] {TCP} 172.16.20.2:40779 -> 192.168.20.10:1433
[**] [1:2010493:3] ET SCAN Non-Allowed Host Tried to Connect to MySQL Server [**] [Classification: Attempted Information Leak] [Priority: 2] {TCP} 192.168.20.5:3306 -> 172.16.20.2:37226
[**] [1:2010493:3] ET SCAN Non-Allowed Host Tried to Connect to MySQL Server [**] [Classification: Attempted Information Leak] [Priority: 2] {TCP} 192.168.20.5:3306 -> 172.16.20.2:37226
[**] [1:2100257:11] GPL DNS named version attempt [**] [Classification: Attempted Information Leak] [Priority: 2] {TCP} 172.16.20.2:34870 -> 192.168.20.10:53

... shortened for easier reading ...

[**] [1:2023753:4] ET SCAN MS Terminal Server Traffic on Non-standard Port [**] [Classification: Attempted Information Leak] [Priority: 2] {TCP} 172.16.20.2:39464 -> 192.168.20.10:464
[**] [1:2023753:4] ET SCAN MS Terminal Server Traffic on Non-standard Port [**] [Classification: Attempted Information Leak] [Priority: 2] {TCP} 172.16.20.2:57356 -> 192.168.20.10:445
[**] [1:2225005:1] SURICATA SMB malformed request dialects [**] [Classification: Generic Protocol Command Decode] [Priority: 3] {TCP} 172.16.20.2:53612 -> 192.168.20.10:445
[**] [1:2225005:1] SURICATA SMB malformed request dialects [**] [Classification: Generic Protocol Command Decode] [Priority: 3] {TCP} 172.16.20.2:53628 -> 192.168.20.10:445
[**] [1:2225005:1] SURICATA SMB malformed request dialects [**] [Classification: Generic Protocol Command Decode] [Priority: 3] {TCP} 172.16.20.2:40338 -> 192.168.20.10:445
[**] [1:2225005:1] SURICATA SMB malformed request dialects [**] [Classification: Generic Protocol Command Decode] [Priority: 3] {TCP} 172.16.20.2:40356 -> 192.168.20.10:445
[**] [1:2225005:1] SURICATA SMB malformed request dialects [**] [Classification: Generic Protocol Command Decode] [Priority: 3] {TCP} 172.16.20.2:40342 -> 192.168.20.10:445
If I were a SOC analyst, my first thought would be “Someone on our VPN network is doing some port scanning”. This is the exact thing we are trying to avoid when incorporating evasive measures into our active scanning routines. Unless your goal as a pentester or red teamer is to test the response of a SOC, you’ll maybe want to hold off from using nmap -sC -sV and rethink how you can be more quiet over the wire.
Limiting your scanning tool’s features
I’m not going to get into the deep technical insights behind how networks operate. But I will point out, the fewer features you’re using in your scanning tool, the fewer packets you’re most likely sending. You don’t need the latest and greatest version of nmap to grab information from a host over the network. The following bash for loop does the trick for identifying open ports and printing the service banner associated with that port:
1
2
3
4
5
6
7
8
9
# loop thru all tcp ports
for i in $(seq 1 65535); do
    # grab service banner from port
    info=$(timeout 1s nc 192.168.20.5 $i 2>/dev/null)
    # if no error, then print port & banner
    if [ $? -ne 1 ]; then
        printf "port: ${i}\n${info}\n\n"
    fi
done
When I run the loop against the Linux machine, I get the following output back:
1
2
3
4
5
6
7
8
9
10
11
12
13
14
15
16
17
18
19
port: 21
220 v20-test.kisoki.local FTP server (Version 6.4/OpenBSD/Linux-ftpd-0.17) ready.

port: 22
SSH-2.0-OpenSSH_8.9p1 Ubuntu-3

port: 80


port: 3306
D�jHost '172.16.20.2' is not allowed to connect to this MySQL server

port: 12715


port: 33060

▒
It’s not as reliable as nmap, but there’s definitely enough information here to safely assume I’m scanning a Linux machine. There’s also enough information for me to enumerate potential vulnerabilities. If I look at my dashboard, I can see there are also far fewer alerts:
1
2
3
4
5
6
7
8
[**] [1:2010935:3] ET SCAN Suspicious inbound to MSSQL port 1433 [**] [Classification: Potentially Bad Traffic] [Priority: 2] {TCP} 172.16.20.2:44590 -> 192.168.20.5:1433
[**] [1:2010936:3] ET SCAN Suspicious inbound to Oracle SQL port 1521 [**] [Classification: Potentially Bad Traffic] [Priority: 2] {TCP} 172.16.20.2:42762 -> 192.168.20.5:1521
[**] [1:2010937:3] ET SCAN Suspicious inbound to mySQL port 3306 [**] [Classification: Potentially Bad Traffic] [Priority: 2] {TCP} 172.16.20.2:36256 -> 192.168.20.5:3306
[**] [1:2010493:3] ET SCAN Non-Allowed Host Tried to Connect to MySQL Server [**] [Classification: Attempted Information Leak] [Priority: 2] {TCP} 192.168.20.5:3306 -> 172.16.20.2:36256
[**] [1:2010493:3] ET SCAN Non-Allowed Host Tried to Connect to MySQL Server [**] [Classification: Attempted Information Leak] [Priority: 2] {TCP} 192.168.20.5:3306 -> 172.16.20.2:36256
[**] [1:2010939:3] ET SCAN Suspicious inbound to PostgreSQL port 5432 [**] [Classification: Potentially Bad Traffic] [Priority: 2] {TCP} 172.16.20.2:51990 -> 192.168.20.5:5432
[**] [1:2002910:6] ET SCAN Potential VNC Scan 5800-5820 [**] [Classification: Attempted Information Leak] [Priority: 2] {TCP} 172.16.20.2:54866 -> 192.168.20.5:5808
Let’s see what alerts are triggered when we fire a regular nmap scan with no flags (i.e. nmap 192.168.20.5):
1
2
3
4
5
6
[**] [1:2010937:3] ET SCAN Suspicious inbound to mySQL port 3306 [**] [Classification: Potentially Bad Traffic] [Priority: 2] {TCP} 172.16.20.2:41209 -> 192.168.20.5:3306
[**] [1:2010936:3] ET SCAN Suspicious inbound to Oracle SQL port 1521 [**] [Classification: Potentially Bad Traffic] [Priority: 2] {TCP} 172.16.20.2:41209 -> 192.168.20.5:1521
[**] [1:2002910:6] ET SCAN Potential VNC Scan 5800-5820 [**] [Classification: Attempted Information Leak] [Priority: 2] {TCP} 172.16.20.2:41209 -> 192.168.20.5:5801
[**] [1:2010935:3] ET SCAN Suspicious inbound to MSSQL port 1433 [**] [Classification: Potentially Bad Traffic] [Priority: 2] {TCP} 172.16.20.2:41209 -> 192.168.20.5:1433
[**] [1:2010939:3] ET SCAN Suspicious inbound to PostgreSQL port 5432 [**] [Classification: Potentially Bad Traffic] [Priority: 2] {TCP} 172.16.20.2:41209 -> 192.168.20.5:5432
By default, nmap scans only a certain number of common ports. With that being said, it looks like the same alerts came up besides ET SCAN Non-Allowed Host Tried to Connect to MySQL Server. That’s because when nmap is run as root, it does half-open scans by default. What this means is that nmap sends a SYN packet to the host port. Once it receives a SYN-ACK packet from the host, it immediately sends an RST packet back to the host to abort the connection before it can be finalized. Netcat does not send an RST packet, allowing the connection to finalize and send a FIN packet.
From what I can tell based on my last two scans, Suricata is still triggering suspicious alerts. I’m still at the point where if a SOC analyst were to receive these alerts, I would give away my position on the network. It’s time to step up my game a bit!
Avoiding and targeting certain ports
As we saw in the last section, I had a few alerts still pop up. It looks like the Emerging Threats ruleset has a few different rules to help detect malicious traffic to some database servers, as well as VNC traffic. It’s also worth mentioning that Postgres and MySQL usually have default permissions set to not allow remote authentication, so there’s probably not much I’ll be doing to access services on those ports. With that being said, I can exclude those ports in my scan. To do this in nmap, you use the --exclude-ports flag followed by a comma-delimited list of ports you wish to exclude from your scan. For my scanning efforts, this will look something like this:
1
nmap --exclude-ports 1433,1521,3306,5432,5800-5820 192.168.20.5-10
This is excluding MSSQL (1433/tcp), Oracle SQL (1521/tcp), MySQL (3306/tcp), Postgres (5432/tcp), and some VNC ports (5800-5820/tcp) from the nmap scan. If I go ahead and run the command, I will find the following output:
1
2
3
4
5
6
7
8
9
10
11
12
13
14
15
16
17
18
19
20
21
22
23
24
25
26
27
Nmap scan report for 192.168.20.5
Host is up (0.0011s latency).
Not shown: 997 closed tcp ports (reset)
PORT   STATE SERVICE
21/tcp open  ftp
22/tcp open  ssh
80/tcp open  http

Nmap scan report for 192.168.20.10
Host is up (0.0017s latency).
Not shown: 988 filtered tcp ports (no-response)
PORT     STATE SERVICE
53/tcp   open  domain
88/tcp   open  kerberos-sec
135/tcp  open  msrpc
139/tcp  open  netbios-ssn
389/tcp  open  ldap
445/tcp  open  microsoft-ds
464/tcp  open  kpasswd5
593/tcp  open  http-rpc-epmap
636/tcp  open  ldapssl
3268/tcp open  globalcatLDAP
3269/tcp open  globalcatLDAPssl
5986/tcp open  wsmans

Nmap done: 6 IP addresses (2 hosts up) scanned in 5.99 seconds
Even better, I’ll find no alerts in my Suricata dashboard:
 The Suricata alerts dashboard in pfSense, showing no alerts after performing a scan without the offending database ports being detected by the Emerging Threats ruleset.
Effectively, I accomplished my goal and was able to perform port scans without being detected. But the reality is, there could be some custom rules to help detect the attempted connection to so many ports in a short amount of time. So I’ll probably need to do more than exclude a few database server ports. What I can do instead, is target only a few ports in my scans. This is also an effective strategy if you’re trying to target a specific service that may have a recent exploit that was made public (Just be careful, the exploit code may already be signatured ;) ).
I’m going to target the FTP (21/tcp) and SMB (445/tcp) services on the target network. In this example, I’m going to use masscan (Just to switch things up a little). The following command will scan port 21 and 445 on the target network’s subnet (192.168.20.0/24). Because masscan uses its own networking stack separate from the OS, I also need to include my VPN interface, as well as its gateway and my IP address on the VPN network:
1
masscan -p21,445 192.168.20.0/24 -e tun0 --router-ip 172.16.20.1 --adapter-ip 172.16.20.2
The output looks something like this:
1
2
3
4
Initiating SYN Stealth Scan
Scanning 256 hosts [2 ports/host]
Discovered open port 445/tcp on 192.168.20.10
Discovered open port 21/tcp on 192.168.20.5
And the best part, I still didn’t trigger any alerts in Suricata. By excluding and targeting specific ports, I’m able to focus on what I’m trying to exploit as well as filter out many of the ports I may end up never interacting with. In the next section, we’re gonna step up the heat a bit and try and make it harder to evade detection.
Limiting the amount of packets you are sending
The SOC team has stepped up their game and has implemented some custom rules. Now whenever I scan, the SOC team is alerted to my scanning and terminates my session. When I run nmap -p 21,22,80,443,445,3389,5985,5986 192.168.20.5-10, the following alerts are generated:
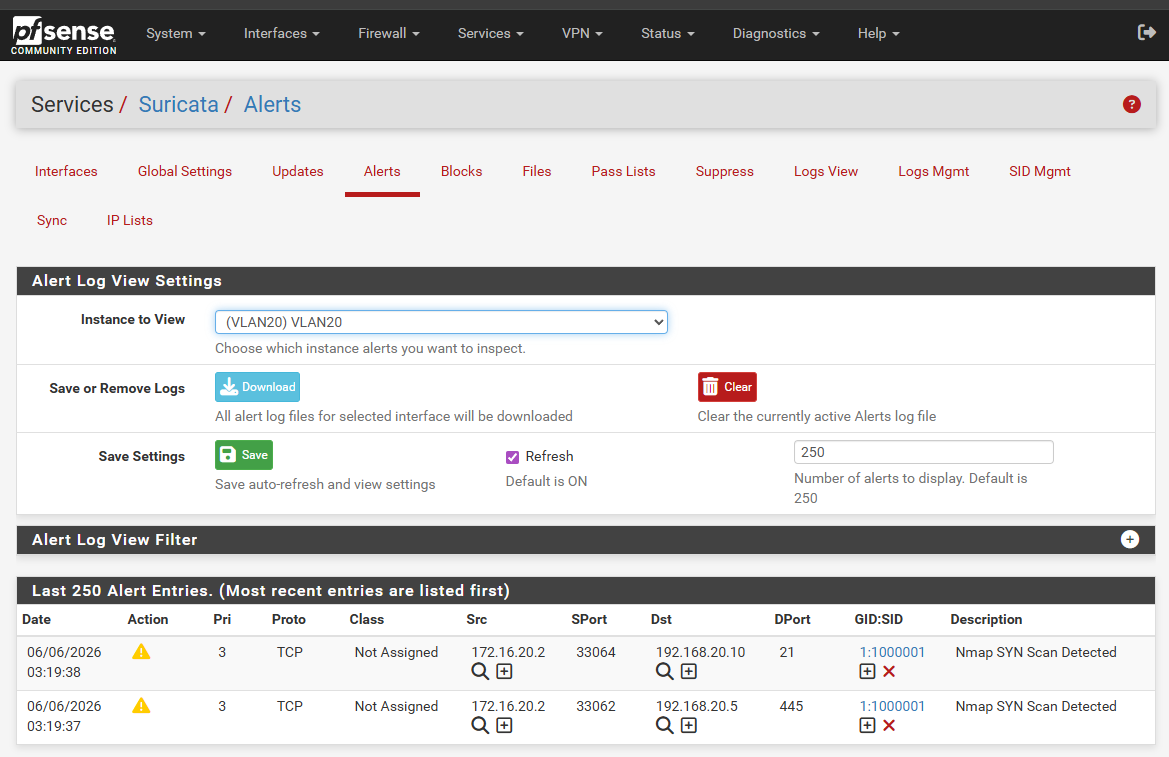 The Suricata alerts dashboard in pfSense, showing a couple of “Nmap SYN Scan Detected” alerts after performing a scan with only a few ports being defined.
What’s happening is a custom rule has been defined to check the number of TCP SYN packets that are sent to a given host within a certain time period. Even though I’m only targeting a handful of ports in my scan, the rule seems to be picking up on my activities and alerting the SOC team. To get around this, I’ll have to limit the number of packets being sent in a given amount of time. I’m able to accomplish this by using the --max-rate flag in nmap. The command looks something like this:
1
nmap --max-rate 2 -p 21,22,80,443,445,3389,5985,5986 192.168.20.5-10
After setting the --max-rate flag to 2 packets per second, I was once again able to fly under the radar.
The threshold for detection was set really low in this example (10 packets in 3 seconds). Normally you would not find a threshold that low in a production environment. Please see Detection of TCP SYN packets for more information.
Using decoys and spoofed IP addresses
Using this technique could end up blocking legitimate users from using the network. Please only use this technique if you have confirmed that the client’s IDS/IPS is set to alert only!
In this post, I’ve had the luxury of being able to watch the alerts dashboard while running my scans. If an alert was triggered, I was able to adjust my scan, and try again until no more alerts were triggered. When you’re simulating an adversary on a production network, you don’t get that luxury. That’s where decoys can come in handy.
Instead of trying to make as little noise as possible, you’re doing the exact opposite. You want to flood the SOC team with as many alerts as possible, from as many different source addresses. That way you can hide safely within the alert fatigue.
Unfortunately, I was not able to recreate this in my lab environment. The spoof address feature in nmap would not generate any alerts, and the decoy feature would only report my true IP address in the alerts. Please use this technique with extreme caution.
Defensive strategies
It’s easy to throw a couple of detection rules in a post, but no two businesses are alike when it comes to securing their network. Different networks carry different standards and compliance requirements, and not all businesses have the same budget.
That’s why, in this section, I focus on different strategies to limit the attack surface of a network instead of offering definite solutions for securing a network.
Develop rules that fit your needs
As we have seen in this post, I was able to take a default ruleset, which is probably used as one of the only lines of detection in many corporate networks, and bypass it with a few simple techniques. When working to secure your network, it takes more than downloading the latest and greatest ruleset. It takes you getting to know the traffic on your network, and defining a strategy on how you’re going to filter legitimate traffic from malicious traffic.
In most instances you would set up a packet capture on a given subnet of your network, and analyze the traffic via Wireshark. This is also useful when sending test scans to see what the scan looks like when traveling over the wires of your network (though I highly recommend doing this in a lab or test environment instead of a production environment). This will give you an opportunity to observe how your traffic is transmitted, as well as what malicious traffic may look like.
I’ll touch on this topic more in the next section as well, because it plays an important role while segmenting your network.
Segment the network and develop custom rules that apply to each subnet
Network segmentation, in my opinion, is probably one of the most underrated strategies when it comes to securing a network. Even though it appears to be a simple strategy, it forces network and systems administrators to organize the endpoints on their network. It’s been said time and again, but should be repeated until it’s taken seriously. You can’t secure a network if you are not aware of what you’re securing. You need to know what is on your network.
Though this doesn’t fix the whole problem, it does allow the network to be sliced up into neat and divided sections. From there, instead of looking at one large subnet (e.g. 10.0.0.0/8), you can have individual areas that can be assigned to different servers and endpoints. Do you have external web servers? great! Put them on 10.10.10.0/24. Do we have the engineering department’s computers? splendid! put them on 10.10.20.0/24. Do we have a bunch of VoIP phones located in a satellite office? let’s stick them on 10.9.1.0/24. This way, we have individual areas for endpoints with similar roles or functions.
This feeds into my next point. When you have your network well divided, you can start to create detection rules that apply more to the endpoints that reside on your individual subnets. Now in our webserver subnet, we can apply detection rules that look for packets that send RST packets to certain web ports or watch for particular web user agents targeting a web server. Same applies for all the other subnets, and the specific requirements and focus those subnets may need. This allows for more hyper-focused detection rules that would otherwise trigger false positives if run against other endpoints.
Though it is a simple strategy, it is not an easy or cheap one to implement. This is a strategy that requires a lot of attention and maintenance. And wherever there is upkeep, there needs to be a budget to continue the upkeep. If you’re developing your own detection rules, they need to be tested regularly. Try and find loopholes, then wash, rinse, repeat. It’s a never-ending cycle, because criminals are always trying to stay ahead. It’s our job to keep up!
Use firewalls to limit access to hosts and ports
Firewalls play an important role as well, taking advantage of network segmentation (though you can configure firewall rules without segmentation). There are three types of firewalls: host-based, network-based, and application-based (We won’t cover the last one in this post). Host-based firewalls only apply to the system they’re configured on, whereas a network-based firewall can apply to the entire network if you configure it to do so.
With segmentation, you can apply network-based firewall rules based on which subnet the source is on, or the destination the packet is trying to reach. Take the following diagram into account:

 Diagram 2: Simple demonstration of firewalls in a segmented network.
VLAN1 can reach the internet and vice-versa. VLAN2 and VLAN3 cannot. VLAN1 can also access VLAN2 since web apps may need to talk to database servers. But VLAN1 cannot access VLAN3, because there is no reason why the web apps need to talk to the VoIP server or phones. The same applies with VLAN3 reaching VLAN2 or VLAN1, and VLAN2 accessing VLAN1. There is just no need for those subnets to speak with each other either.
If you notice the VOIP-SERVER, it looks like it can communicate with the internet even though VLAN3 cannot. This is very normal in firewalls as well. Just because one server needs access to the internet, doesn’t mean the whole subnet needs access. You can even define firewall rules to specify which source can access a destination’s port. Take the following diagram into account:

 Diagram 3: Simple demonstration of using a firewall to block ports in a segmented network.
WEB01 in VLAN1 can reach port 3306 (MySQL) on DB01 in VLAN2. But WEB01 in VLAN1 cannot access port 22 on DB01 or any port on DB02 within VLAN2.
Taking both diagrams into account, if I were able to gain remote code execution on VOIP-SERVER, I would have a hard time running network scans on anything other than the phones within VLAN3. And if I were able to gain remote code execution on WEB01, I’d only be able to access other web servers within VLAN1 and MySQL on DB01 in VLAN2. This drastically reduces the attack surface an adversary has to work with, which is why it is an effective strategy in defending a network.
Detection of TCP SYN packets
I’ve saved this part for last, because it is a double-edged sword. While this is an easy way to detect host and port scanning, it is also an easy way to collect A LOT of false positives if not properly implemented. For instance, say you have the following Suricata rule loaded:
1
2
# detect if 20 or more TCP SYN packets are being sent to a host within a 3 second period
alert tcp any any -> any any (msg:"Nmap SYN Scan Detected"; flow:stateless; flags:S; threshold:type threshold, track by_src, count 20, seconds 3; sid:1000001; rev:1;)
This rule will create an alert if 20 or more TCP SYN packets are sent to an individual destination within a 3 second window. While this is very effective at detecting TCP SYN flooding, I want you to take a look at the following HTML and imagine this is a webpage hosted on a webserver within a network with the above detection rule in place:
1
2
3
4
5
6
7
8
9
10
11
12
13
14
15
16
17
18
19
20
21
22
23
24
25
26
27
28
29
30
31
32
33
34
35
36
<html>
    <head>
        <title>page</title>
        <script src="js/1.js"></script>
        <script src="js/2.js"></script>
        <script src="js/3.js"></script>
        <script src="js/4.js"></script>
        <script src="js/5.js"></script>
        <script src="js/6.js"></script>
        <script src="js/7.js"></script>
        <script src="js/8.js"></script>
        <script src="js/9.js"></script>
        <script src="js/10.js"></script>
        <script src="js/11.js"></script>
        <script src="js/12.js"></script>
        <script src="js/13.js"></script>
        <script src="js/14.js"></script>
        <script src="js/15.js"></script>
        <script src="js/16.js"></script>
        <script src="js/17.js"></script>
        <script src="js/18.js"></script>
        <script src="js/19.js"></script>
        <script src="js/20.js"></script>
        <script src="js/21.js"></script>
        <script src="js/22.js"></script>
        <script src="js/23.js"></script>
        <script src="js/24.js"></script>
        <script src="js/25.js"></script>
        <script src="js/26.js"></script>
        <script src="js/27.js"></script>
        <script src="js/28.js"></script>
        <script src="js/29.js"></script>
        <script src="js/30.js"></script>
    </head>
    <body>This page loads 30 files.</body>
</html>
As you can see from the text within the body tag, this page calls upon 30 separate javascript source files. It is normal for a modern webpage to load 20+ assets (images, stylesheets, javascript, fonts, etc). If your webserver is not configured to use connection pooling and a user were to load this webpage, you would trigger the detection rule listed above. This is a great example showcasing that you need to be aware of the types of traffic on your network, and how it can affect your detection rules. If you had 100 unique visitors an hour, that’s 100 unique false-positive alerts triggered each hour.
This pairs well with the section above where I talk about creating custom detection rules for individual subnets. Maybe you would set a higher threshold count within a DMZ subnet hosting web servers with high amounts of web traffic. There is no definite solution, as every network has different use-cases and requirements. But being aware of instances like this will make your SOC team’s lives much less stressful when creating new detection rules.
Things to consider
Whenever deploying defensive strategies, it is important to remember that you’re not eliminating the chance of a threat. Instead, you are buying yourself time to identify and neutralize threats. The one thing that threat actors will always have on their side is time. Hopefully the techniques and strategies I have demonstrated in this post help to solidify this ideology.
I’d also like to reiterate a very important point. The sole existence of a red team is to assist the blue team. It’s great if you know how to evade network defenses, but it’s even more important that you are able to translate your findings into effective solutions for detecting future threats.
Conclusion
In this post, I’ve covered techniques for evading network detection. This included running simple banner grabs, targeting or avoiding specific ports in a scan, limiting the number of packets sent in a given time period, as well as briefly covering the use of IP spoofing and decoys in a scan. Though this does cover a good amount of evasive techniques, it surely is not the definitive list. There is research being done every day to find new approaches to carrying out stealthy scans and attacks over a network.
I’ve also covered some defensive strategies to help limit the attack surface an adversary may have, as well as buying time to detect and neutralize threats. This included analyzing a network and building custom detection rules to fit its unique needs, implementing network segmentation and detection rules to fit each subnet’s traffic patterns, as well as enforcing stricter firewall rules to limit needless connectivity. I also dived into the effects of over-tuning detection rules, and the implications it can carry.
There is so much more that could probably be done to secure a given network, but with these strategies you can help to better defend your business against the bad guys, and limit the information they’re able to obtain from your network.